

Today we'd like to show you some techniques to work with Chalky paint or to give a new life to old objects or furniture. As you probably know, Chalky Paint is perfect for these projects, as there is no need to apply primer or sand the surface before painting it.
Different techniques for using Chalk Paint
It's quite versatile so, with different techniques, you can achieve a different result, such as the vintage look we all adore. So that you can enjoy these paints and get the most out of them, we want to share with you seven different techniques. Let's go!
‣ Water Stripping
It may seem impossible, but it's quite easy.
Materials:
- Chalky paint
- A soft, damp cloth
To get this effect, use this technique when the object is already painted with Chalky paint.
Instructions:
- Apply the Chalky paint and, then, within 15-45 minutes after the application.
- Dampen the cloth in clean water, squeeze out the water excess, and rub the areas to be stripped until the desired amount of paint is removed.
Tip: if you want to strip a large area, work in sections and use different cloths.
‣ Stripping with sandpaper
www.mops.org
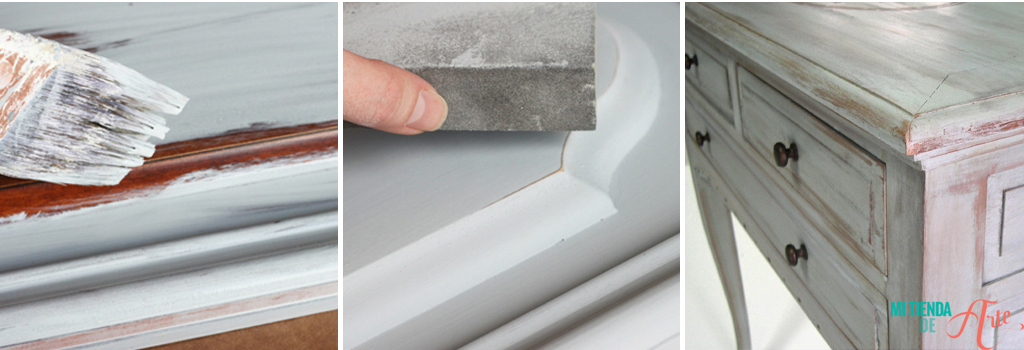
Maybe the most traditional technique is very easy as you have total control over the final result.
Materials:
- Sandpaper
- Chalky paint
Steps:
- Spread the paint over the surface and once it is dry - the paint becomes matt - start sanding.
- Choose fine-grit sandpaper to start the stripping and press lightly, repeating along the edges, handles, rubbing areas, etc. until you get the desired effect.
- Finish off the piece with heavier grain sandpaper or apply more pressure to pickle other areas more intensely.
Tip: you can apply wax before or after sanding. If you do it before, you will have to apply another coat of wax. And remember that if you wax with steel wool, the surface may become a little greyish.
‣ Pickling with non-stick coatings
www.elchalkyblog.blogspot.com.es
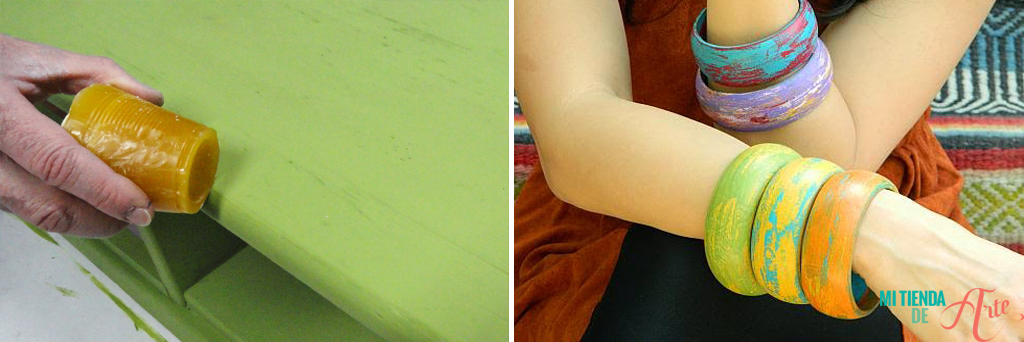
For this technique, you need solid or gel waxes, meaning the Chalky paint layer does not fully adhere, making it easier to strip.
There are several non-stick waxes: solid waxes, gel waxes, candles… And depending on which one you use, the process varies slightly.
Instructions with solid wax:
- Rub the solid wax (whatever type it is) over the areas where you want the underlying colour to appear. You can previously paint with a colour you like or let the natural colour of the object show.
- Wipe off the wax particles with a clean cloth before applying the Chalky paint.
Instructions with gel wax:
- Apply the wax to the area you want the Chalky paint to adhere. You can do this using a rag, a brush, or your fingers.
- When painting with Chalky paint, do it gently so as not to drag the wax and smear it on other parts of the object.
‣ Overlapping colours
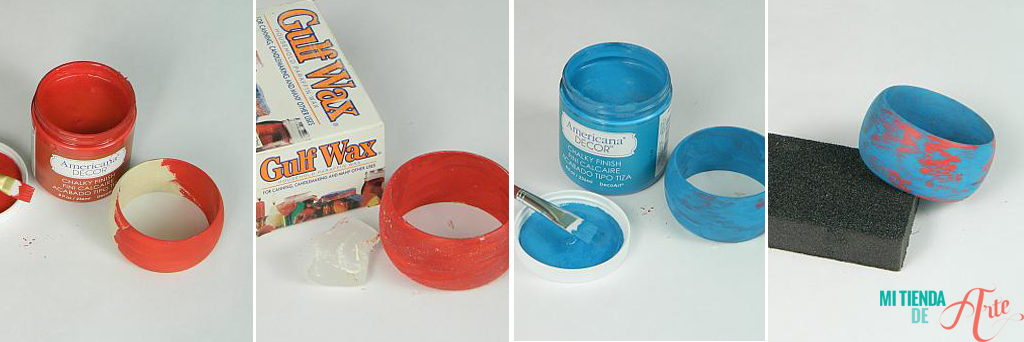
If you want to experiment with colours, you can take advantage of the wide range of Chalky colours.
www.decoart.com
Materials:
- Two or three different Chalky paints.
- Sandpaper
- Anti-adhesive (solid wax or gel, etc.)
- Wax or varnish
Instructions:
- Apply the first colour and let it dry.
- Apply the anti-adhesive to those areas that you want to strip.
- Apply a new coat of paint and let it dry.
- Sand those parts where you have applied the wax. Start applying light pressure to remove the top layer. If you like, apply more pressure to get a deeper stripping.
- Remove the pickling dust and apply wax or varnish to seal and protect the piece.
Tip: you can repeat these same steps if you want to use more colours.
‣ Dry brush technique
With this technique, you can get an aged look without needing to strip it. All you need is to practice a little and a brush.
Materials:
- Brush
- Chalky paints
- Cloth
- Wax or varnish
How to do it:
- Apply the base colour of your choice and let it dry.
- Apply a contrasting colour with the brush and rub the brush on a rag to remove the excess.
- Spread the paint over the surface with long strokes. Reload the brush as necessary, always being careful to remove the excess.
- Apply a final coat of wax or varnish to seal and protect the piece.
‣ Stencil technique
Perfect to decorate your objects with a vintage style.
Materials:
- Stencil
- Masking tape
- Blending tool
- Chalky paints
- Rag
- Wax or varnish for the final finish
How to do it:
- Place the stencil on the surface you want to paint and fix it with masking tape.
- Paint over the stencil with a sponge. Spread the paint with long, perpendicular strokes.
- Remove the stencil carefully and let the paint dry.
- Sand the surface in a single direction and, finally, apply Cerax or Americana varnish to seal and protect the piece.
‣ Wax patina technique

www.decoart.com
Instructions:
- On a dry surface, apply the first coat of wax and wait. Then apply a second coat and let it dry. For best results, always apply thin layers.
- Polish the surface with a lint-free cloth where you have applied the layers of wax.
Tip: You can add some Chalky paint to the wax before applying it to give it a touch of colour or use metallic acrylic paint with Americana Decor colourless wax.
Tip: if the result it's too dark, you can use a clean cloth to apply light wax on those dark areas to remove the excess.
With all these techniques, we encourage you to try each of them and transform your everyday objects.
There are many brands of Chalk paint on the market that you can buy, we recommend you:
- Chalk Paint de la Pajarita
- Americana Decor Chalk Paint
- Dayka Chalk Paint
- Chalky Paint spray paint








