
If you want to give a special gift or give a spring look to your home, we suggest a creative challenge: decorating letters! In this post, you will find five different ways to make them look great.
This trend, which started as something specific for big events (we used to see it, especially at weddings), has burst onto the scene, and now it's making its way into our homes.
We're going to explain how to decorate cardboard letters in a simple but very appealing way, it can be a great gift for a wedding or the birth of a baby. You'll find here different versions so that you can choose the one you like the most or that catches your eye.
What do you need?
Basically, it depends on the type of decoration you're making. Anyway, the most important thing is the letters. You can find them in DM or cardboard. Each material will be useful depending on the type of decoration you choose.
Decoupage decoration
We know that there are some great fans of this technique around here, so we are sure that this is nothing new for you, but if you are new to decoupage, something simple like a letter is ideal to get you started.
Materials needed:
- Cardboard letter.
- Decorative napkins or decoupage paper.
- Decoupage glue
- Scissors, cutter, and paintbrush.
Instructions:
If you use napkins, remove the white layers and work only with the decorated sheet.
You can start with the edge of the letter as this is the most complex part, but in this case, the order does not alter the final product. Cut uneven pieces and cover these areas with glue. Then, glue the pieces of paper using your hands or a brush. We recommend you have a stick or toothpicks at hand for the more complex parts (like, in the case of the photo, the peaks of the M).
Continue with the front and back sides of the letter, following the same procedure. Remember that it is better to use a small amount of glue and apply it in layers, as this will prevent the napkin from getting wet and tearing.
Once the letter is covered with napkin papers, let it dry and that is all, your letter is ready!
If you want to protect your creation a bit, you must know that most decoupage glue is also a sealant, so you can apply a protective layer with clear drying.
You can finish off the letter by adding some scrap decorations such as tags, flowers, lace, etc. It's up to you.

Decoration with flowers
These letters look stunning! There are two options: using artificial flowers or natural ones. The procedure is different, so let's go through the explanation!
Decorating with artificial flowers:
Materials:
- Cardboard letters.
- Artificial flowers can be of various models (we recommend no more than 3 types to give a homogeneous appearance to the whole).
- Spray paint.
- Silicone gun (or glue if not available).
- Scissors and cutter.
Instructions:
With the help of a pair of scissors and a cutter, cut out the front face of the cardboard letter so that there is a cavity.
Next, paint the letter with spray, covering the entire surface.
Cut out the artificial flowers, remove most of the stems, and using the silicone gun, stick the flowers to the inside of the letter until the letter is complete.

Decorate with natural flowers:
Materials:
- Cardboard letters
- Florist's sponge
- Natural flowers
- Glue, scissors, and cutter
Instructions
With the help of a pair of scissors and a cutter, cut out the front face of the cardboard letter so that there is a cavity.
Cut the sponge to cover the hollow inside the letters. You can use glue to stick the sponge inside so that it doesn't fall out.
Next, choose the flowers you like best and cut the stem, but not too short, so that it can be inserted into the sponge and hold the flower in place.

Decorate with some pompoms
This option is very colourful and fun, especially for a children's room or as a birthday present, there's nothing better than something personalized and handmade!
Materials:
- Cardboard letters
- Woollen pompoms (handmade or bought) or paper pompoms.
- Glue, scissors, and cutter
- Paper, paint, or washi tapes to decorate the rest of the surface.
Instructions:
If you want the letter to be decorated on the back, you can paint it or decorate it with decoupage following the instructions above. Another simple option is using washi tapes to decorate the back because washi tape can be used for a lot of things!
Take the pompoms and glue them one by one until the whole letter is covered. You can use hot glue for this as it sticks superfast.
You can also make your own pompoms with paper or wool to decorate letters.
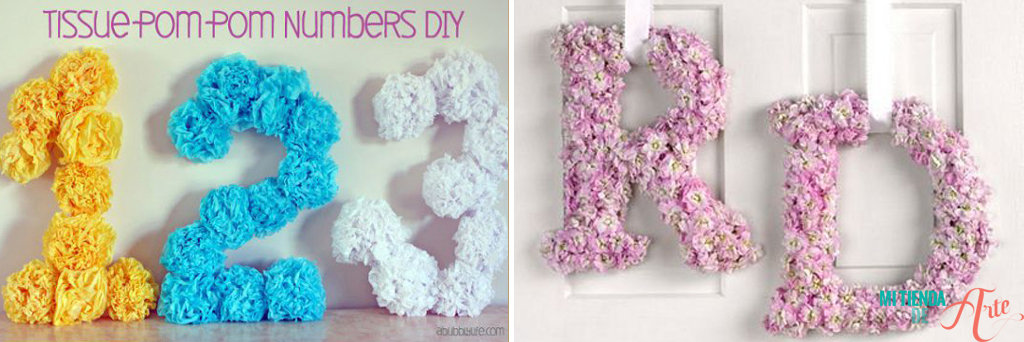
bespoke-bride.com / www.designdazzle.com
Decorating letters with wool
If you are a knitter or have some wool leftovers at home, this option is very warm and natural.
Materials:
Instructions:
Glue the surface of the letter in sections, so that the glue does not dry out.
Run the wool over the glued parts until you cover the letter. It is best to do it horizontally and to start in the most difficult to reach areas.
You can use various coloured wools. In this case, always remember to place the wool knots at the back so that there are not visible.
To finish, make another run of wool over the letter, this time vertically so that the final result is thicker.
Decorating letters with paint and glitter
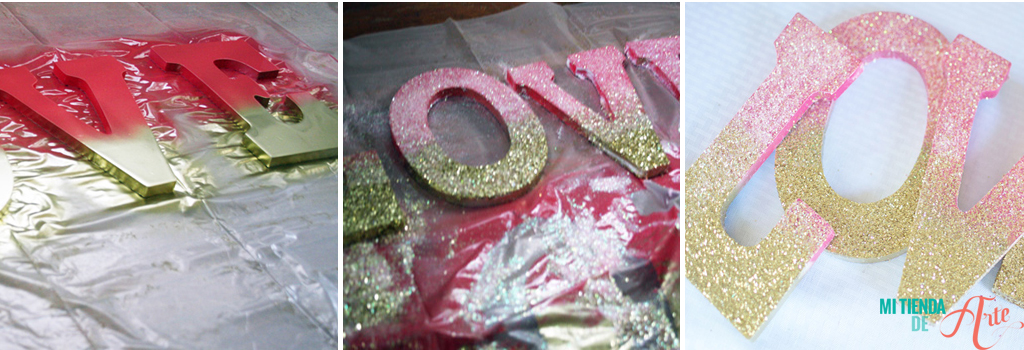
If glitter is your thing, these will be your favourite letters, great for special celebrations such as birthdays, weddings, etc.

Decorating with paint and glitter
Materials:
Instructions:
Spray the lettering with the spray paints, so that they are well covered, and leave to dry for 30-60 minutes.
Once the paint is dry, use a sponge to apply the Mod Podge and sprinkle the glitter. Let it dry completely.
Turn the letters over and let the glitter residue fall off. Now, you can apply a new layer of mod podge to avoid glitter loss over time.
What was your favourite letter decoration? We hope this first creative challenge inspires you.








